Deploying multiple projects from one solution with Azure DevOps
If you are building a modern web application, you will often need a frontend and a web API. I always want to keep these projects apart to maintain separation of concerns but to enable easy code sharing and developer focus, I also like to keep the projects in one solution. I love to use Azure DevOps for my CI/CD work, so I want to deploy these artifacts with one pipeline. In this post, I will show you, how you can do this. I do expect some basic knowledge about setting up a build and release pipeline in Azure DevOps.

The default settings for the build can be used.
 By default, all projects will be built and all projects containing the text “Test” will be tested. For this solution, this is the desired behavior.
In the Publish step one setting must be changed:

By default, the option for “Publish Web Projects” is checked. This option instructs the build pipeline to scan for Web deployable projects. For Azure DevOps, this means that only projects with a wwwroot folder or a web.config are deployable. The WebAPI project does not contain either, so in order to deploy a WebAPI project, this option must be unchecked.
The build can now be saved and run.
After the build completes, a zip file will be created for every project in the solution. This also applies to test projects. Not all of these outputs are needed in the release pipeline, but the simple projects will not take up much space. The drop files can be found through the build summary.

The drop files can be viewed by clicking on the artifact line item. In the following screen, the available artifacts are shown.

This build can now be deployed on Azure by a release pipeline.
Visual Studio Solution
For this blog post, I created the following solution.

The solution contains a web application and a WebAPI. Both projects share the Domain class library.
Build pipeline
The solution can be built with the classic workflow or using the new yaml templates. For this post, I use the classic editor with the template for ASP.NET Core.


The default settings for the build can be used.
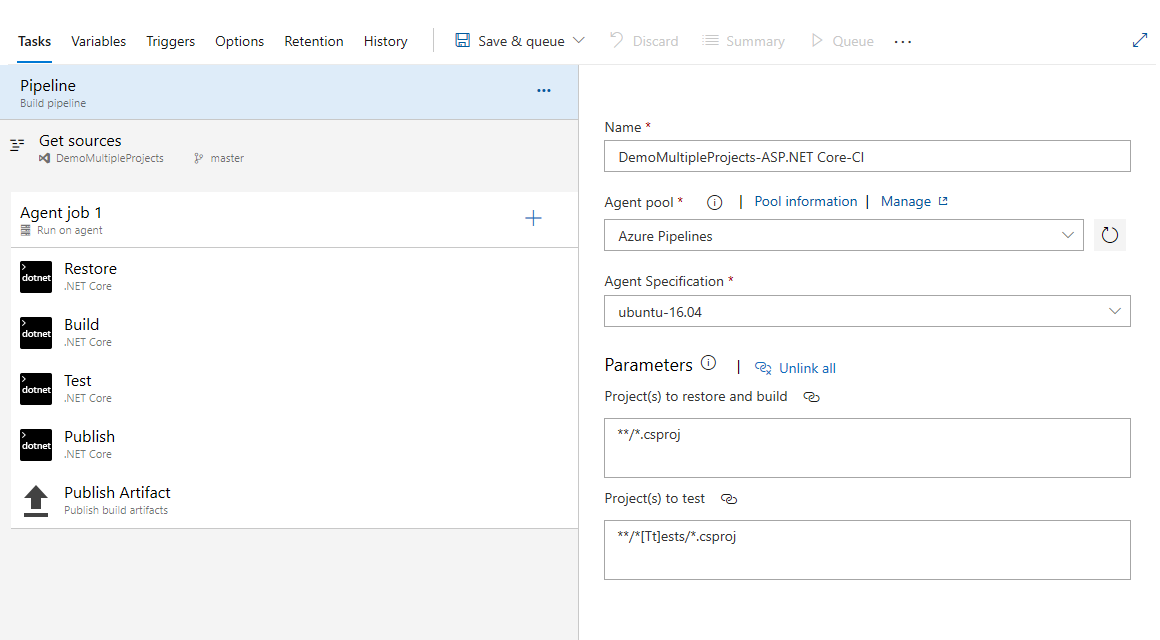
In the Publish step one setting must be changed:

By default, the option for “Publish Web Projects” is checked. This option instructs the build pipeline to scan for Web deployable projects. For Azure DevOps, this means that only projects with a wwwroot folder or a web.config are deployable. The WebAPI project does not contain either, so in order to deploy a WebAPI project, this option must be unchecked.
The build can now be saved and run.
After the build completes, a zip file will be created for every project in the solution. This also applies to test projects. Not all of these outputs are needed in the release pipeline, but the simple projects will not take up much space. The drop files can be found through the build summary.

The drop files can be viewed by clicking on the artifact line item. In the following screen, the available artifacts are shown.

This build can now be deployed on Azure by a release pipeline.
Release Pipeline
For the web application and for the WebAPI I created separate App Services in Azure. These are simple Linux app services without any special configuration.
The first step in creating a pipeline is specifying which template to use. The template for Azure App Service Deployment has all of the desired functionality.

After this choice, the user interface will present you with an option to specify the Stage.

To keep my releases easy to understand, I changed the stage name to match the project I want to deploy to Azure. There is no save option, so you can close the dialog and the changes will be updated automatically,
The release pipeline still has no input specified. You can do this, by clicking on “Add an Artifact”.

In the settings for the artifact, you must select the build pipeline you have set up earlier. After this modification, you can close the dialog.
The pipeline now knows which drop files are available, so we can configure the first deployment. You can reach the options for this by clicking on the link “1 job, 1 task”.

You need to specify your Azure Subscription in the dialog that is presented to you. If you have not used your Azure Subscription in this Azure DevOps project before, then you must first authorize your account to configure the pipeline. This authorization process uses a popup dialog, so be aware of popup blockers.

After verification, you can select your App Service to deploy to. Please pay attention to the App Type. If you do not select the same type as you have used in Azure, the App Service Name cannot be found.

After selecting the correct App Service, you must also specify which part of the build output you want to be deployed. This setting can be found in the “Deploy Azure App Service” tab.

If you click the ellipses, the correct zip file can be selected.

Unlike the previous screens, you must save the release pipeline configuration by pressing Save on the top of the screen. You can now select where to store the stage. The default option will do.
The configuration for the web application is now complete. For the WebAPI we will have to repeat these steps, but before we can do that we need to add a step to the pipeline.

You can add a new stage by pressing the Add button. If you select the artifact before pressing the Add button, a new stage will be added below your current stage.
Once you have created the stage and given it a meaningful name, you can configure it.
The first part of the configuration is mostly repeating what we have done previously, except for the selection of the correct app service name.

In the deploy tab, we need to select the WebAPI.zip for the package or folder.

Both stages are now completely configured and the release can be executed by clicking on “Create Release”.

This screen shows that both stages will be released. After clicking on “Create” the release is executed.
The output of the release can be tracked in the “Release X” screen.
If everything went well you will see the success status for both deployments.

The first step in creating a pipeline is specifying which template to use. The template for Azure App Service Deployment has all of the desired functionality.


To keep my releases easy to understand, I changed the stage name to match the project I want to deploy to Azure. There is no save option, so you can close the dialog and the changes will be updated automatically,
The release pipeline still has no input specified. You can do this, by clicking on “Add an Artifact”.

In the settings for the artifact, you must select the build pipeline you have set up earlier. After this modification, you can close the dialog.
The pipeline now knows which drop files are available, so we can configure the first deployment. You can reach the options for this by clicking on the link “1 job, 1 task”.

You need to specify your Azure Subscription in the dialog that is presented to you. If you have not used your Azure Subscription in this Azure DevOps project before, then you must first authorize your account to configure the pipeline. This authorization process uses a popup dialog, so be aware of popup blockers.

After verification, you can select your App Service to deploy to. Please pay attention to the App Type. If you do not select the same type as you have used in Azure, the App Service Name cannot be found.

After selecting the correct App Service, you must also specify which part of the build output you want to be deployed. This setting can be found in the “Deploy Azure App Service” tab.

If you click the ellipses, the correct zip file can be selected.

Unlike the previous screens, you must save the release pipeline configuration by pressing Save on the top of the screen. You can now select where to store the stage. The default option will do.
The configuration for the web application is now complete. For the WebAPI we will have to repeat these steps, but before we can do that we need to add a step to the pipeline.

You can add a new stage by pressing the Add button. If you select the artifact before pressing the Add button, a new stage will be added below your current stage.
Once you have created the stage and given it a meaningful name, you can configure it.
The first part of the configuration is mostly repeating what we have done previously, except for the selection of the correct app service name.

In the deploy tab, we need to select the WebAPI.zip for the package or folder.

Both stages are now completely configured and the release can be executed by clicking on “Create Release”.

This screen shows that both stages will be released. After clicking on “Create” the release is executed.
The output of the release can be tracked in the “Release X” screen.
If everything went well you will see the success status for both deployments.

Thanks for this example it is very much helpful, I have one questions on this my scenario have three configuration files with Web and API each. Web.QA.Config and production.
ReplyDeleteI want to copy all these files release stages, I want this files to be in my deploy-able package so I can transform those files in release stages. I did exercise with single project it works fine.
I want to replicate same process for multiple projects. where I can't add these files in .zip package.
All configuration files in your code are placed in your zip-files in your drop folder by default. Which build action have you specified for the configuration files?
DeleteThis comment has been removed by a blog administrator.
ReplyDeleteHow can I achieve the same for asp.net projects (not .net core)? I am facing difficulty retoring nuget packages since they are not where my csproj is.
ReplyDeleteIf you use the 'classic' build, you can use the "ASP.NET" template. In the step "NuGet restore" you can specify the "**\*.sln" for your path setting. Normally you don't have to change this setting, because it is the default value. If you are still running into problems, send me a tweet.
DeleteThis comment has been removed by a blog administrator.
ReplyDeleteThis comment has been removed by the author.
ReplyDeleteIf come error from 1 project out of 2 projects then what will happen?
ReplyDelete1. Total execution stopped?
2. Or skip error project and continue other?
Thank you for your brief description.
The deploy steps in this setup are not dependent on each other, so one can fail and the other can still succeed.
DeleteThis comment has been removed by a blog administrator.
ReplyDeleteIn my application we have many api services , which contains 3 project(API,BC ,DAC) while creating the pipeline all the projects are building , i want to build only this three projects . In tfs i am able to select the reppository source and build. but in devops there is no option for selecting the particular project. please advise'
ReplyDelete